Pond Dig, part 4

Photo: Pond, fully dug, with four levels and a measuring line across

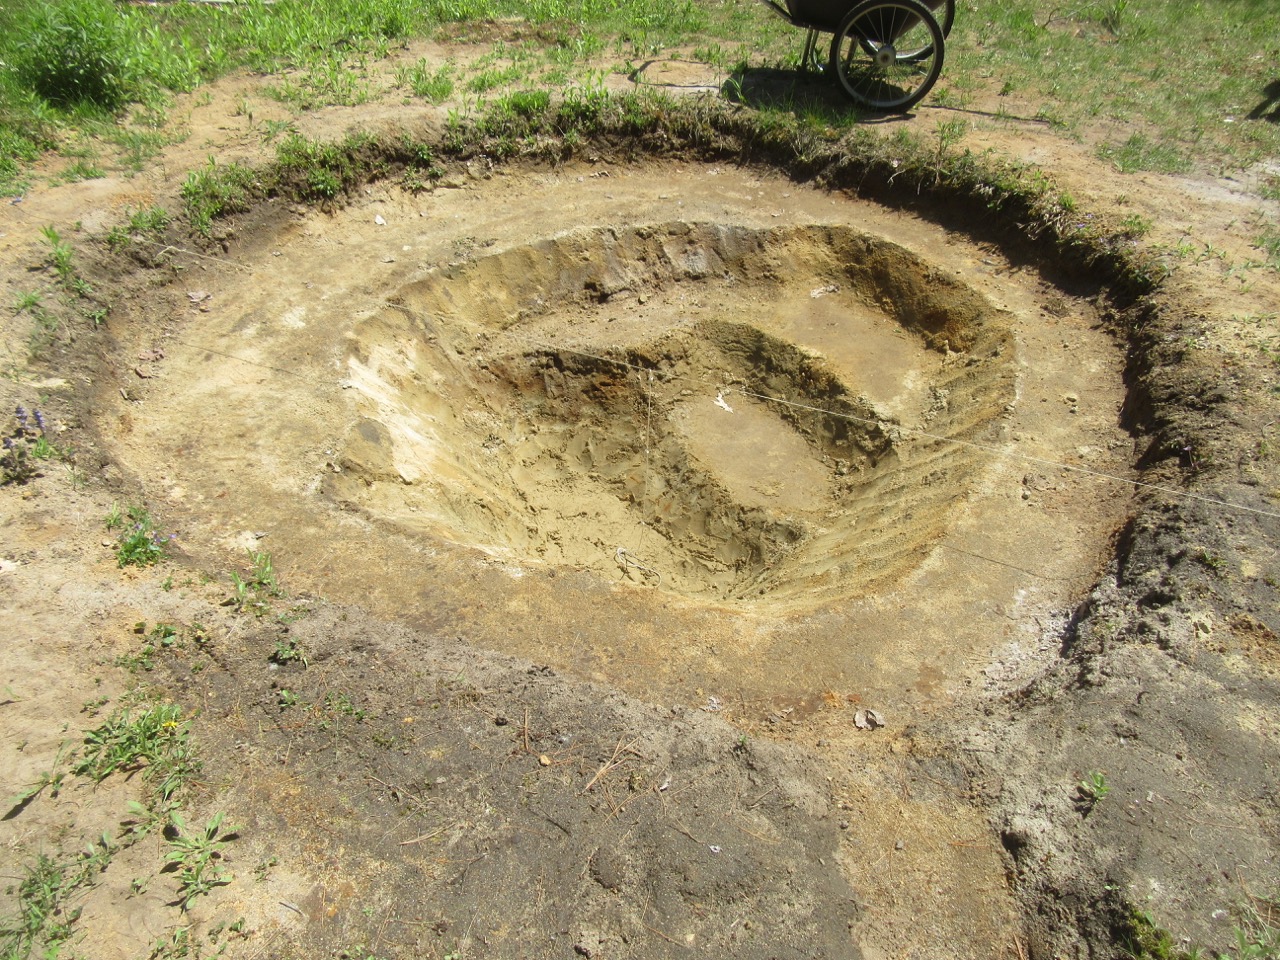
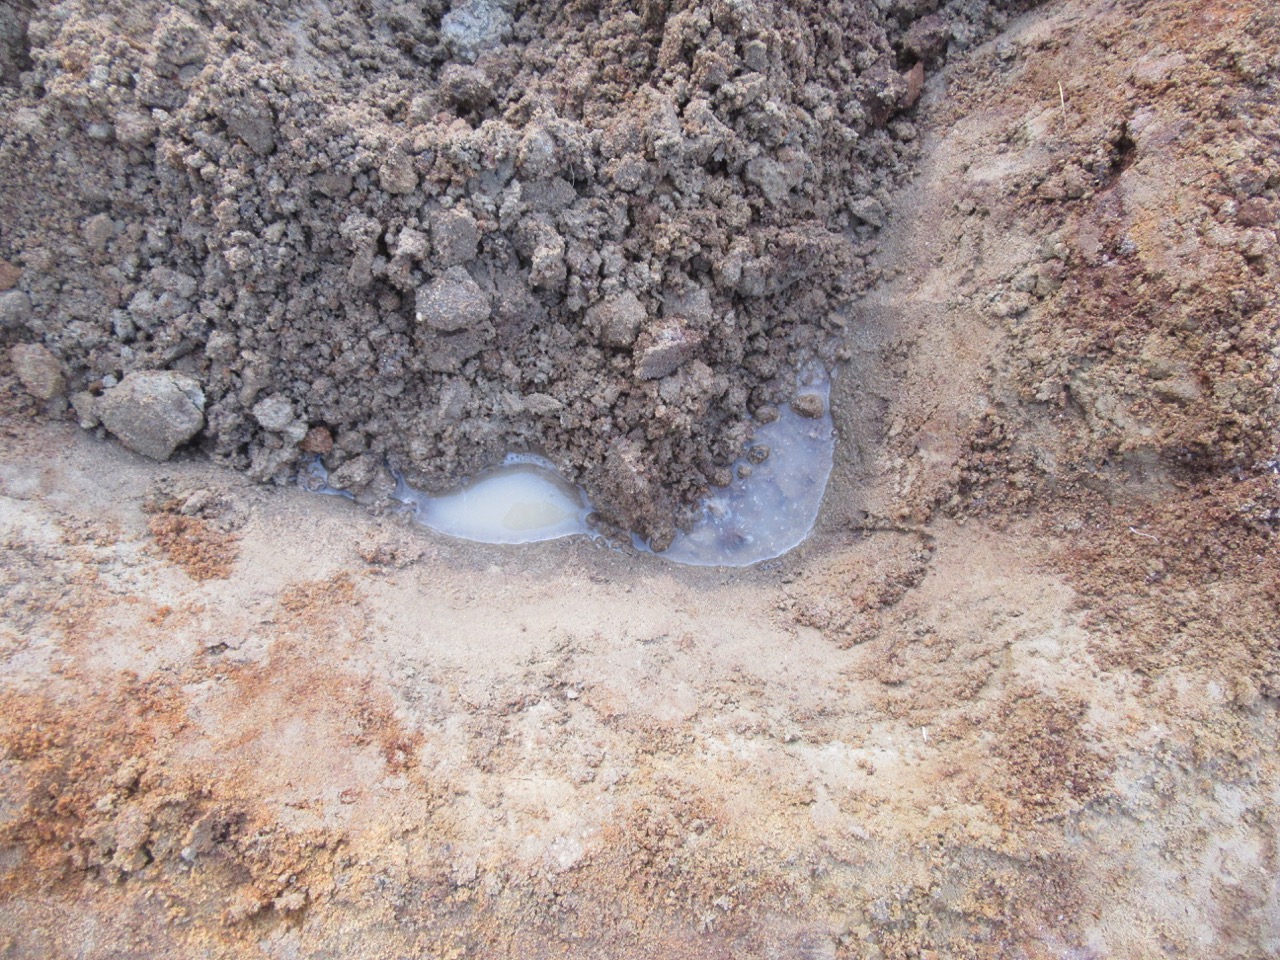
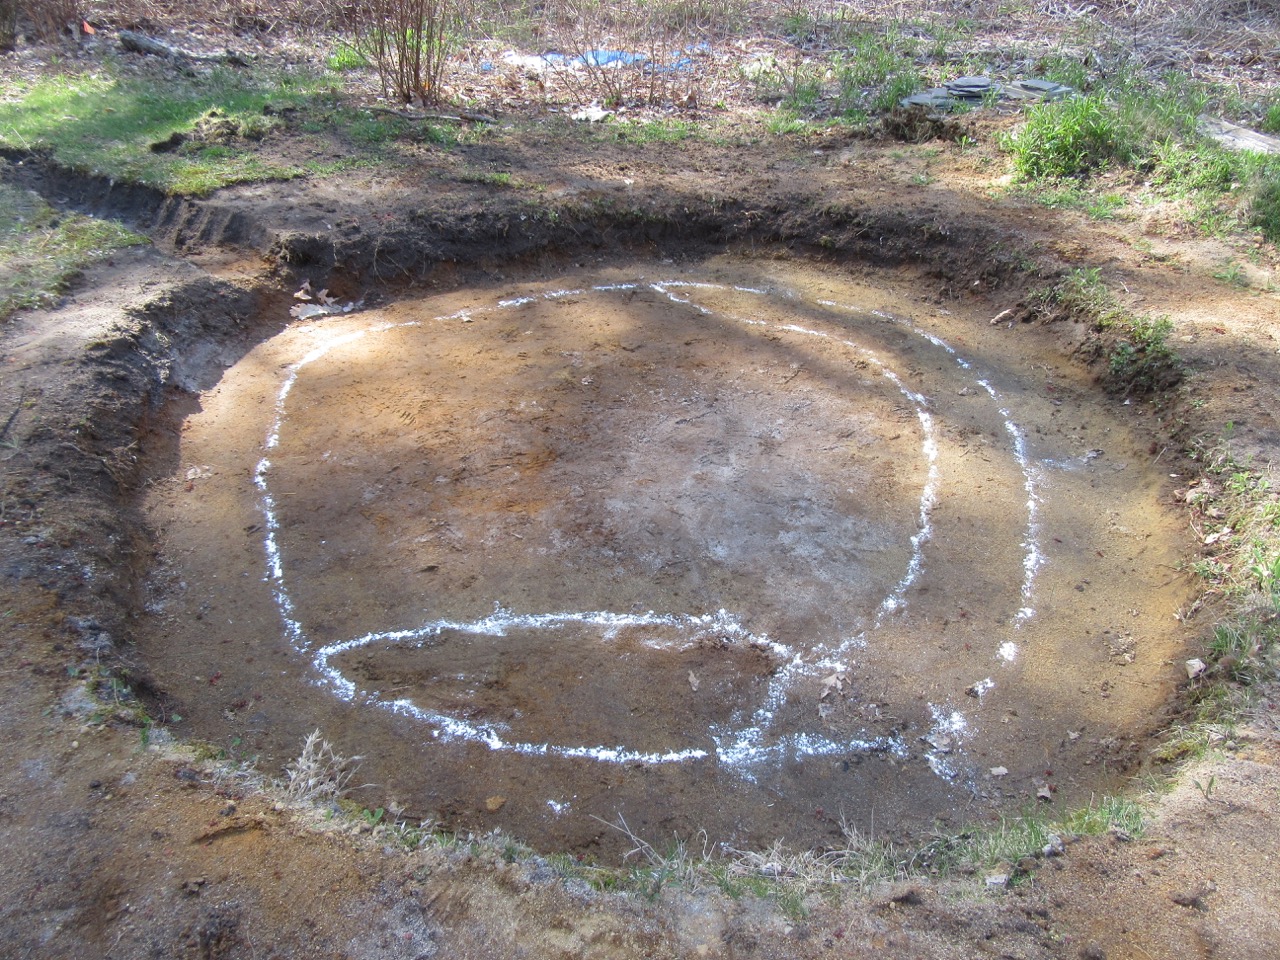
Hurray! I’ve been back to digging the pond the last couple days, and today I finished the bottom layer! I hit clay soil at about 2 1/2 feet down, and went a little deeper in one spot. For those who were wondering about the water that showed up in the bottom, I learned, after consulting other folks, that it’s probably not really a bit deal. It might possibly lift the liner in the spring a small amount, but on the other hand, the water in the pond might have enough weight to counter that. In any case, over the last several days of not much rain, there is no standing water, though the soil I’ve dug out has been damp.

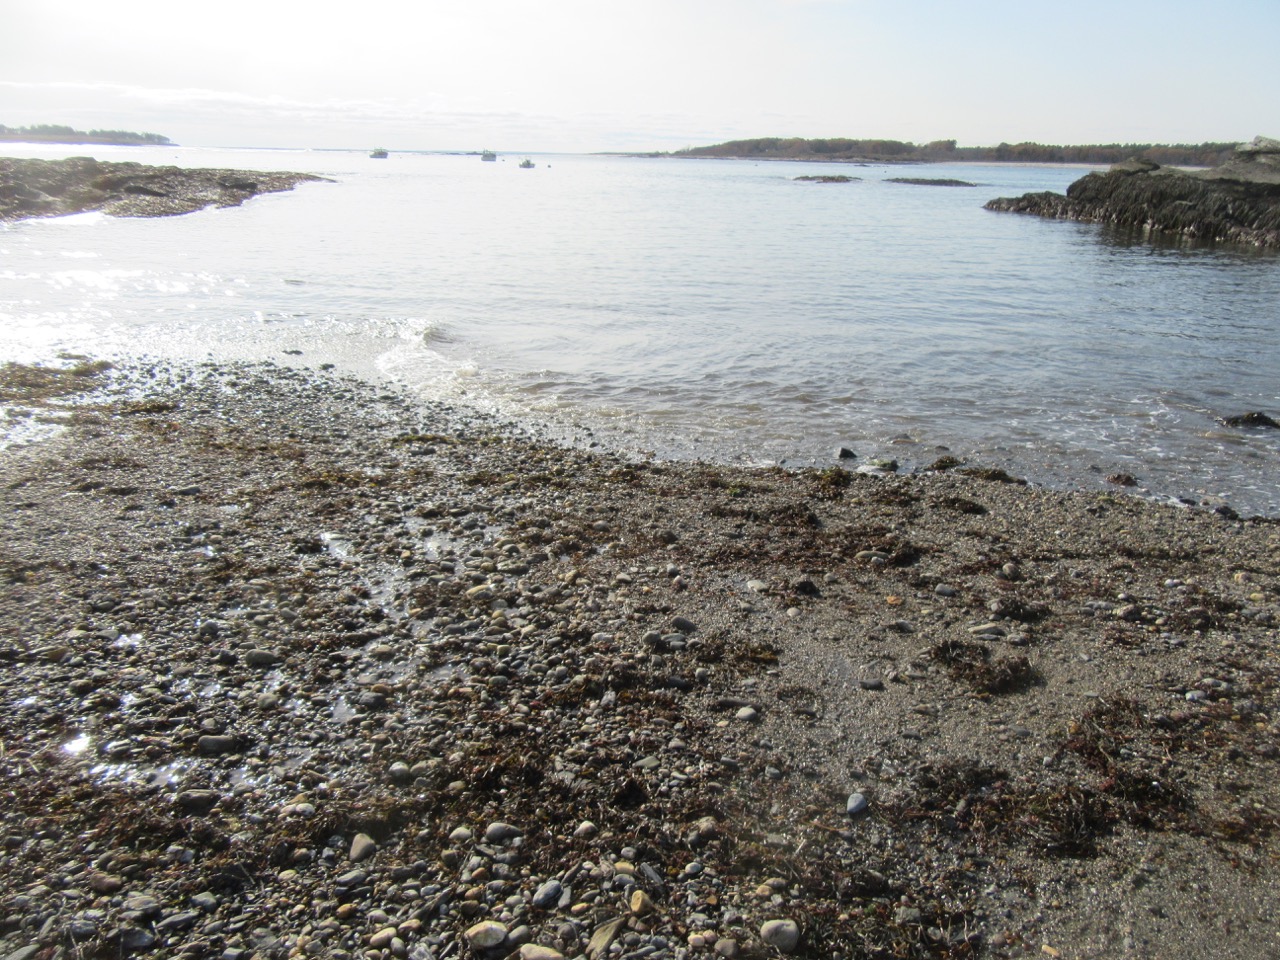
So I ended up with four levels: first level all around the edge for planting (at about 10 inches down), second for a step, plus another spot to plant pond lilies, third another step down, and fourth the very bottom. The bottom is about 2 ft. 10 inches feet deep, though more like 2 1/2 feet from the top of the water once filled, since there is an overflow channel about 4 inches down from the top. I decided to let the clay soil be my guide for stopping at that depth. The very thin white line you can see across the pond is my measuring-depth-device–a string anchored in the ground at each side, and then another string looped onto it, marked with knots at each foot, and weighted so it hangs down.

It has been a lot of hard work to do the final levels, because each damp shovel-full had to be carried up the steps to the top step to put it in the wheelbarrow. And then, when I wheeled it all to the mound where it was going, I had to shovel it onto the mound. (Eventually I will add compost to the mound, and plant some sort of ground cover.)

Photo: Mound where I put the dirt, to cover old demolition waste, then put cardboard on top, then more pond soil.

The next step will be to cut old carpet into strips, to layer over the ground to keep roots from coming through, and to protect the pond liner. And surprisingly, there were small bittersweet roots all the way down to the bottom level. I have a pile of old carpet that I collected from willing volunteers (via Freecycle and Buy Nothing) last week, that is sitting on the patio, waiting for me.

But for now, I am coming inside to rest, with sore muscles but a happy heart. It has been so satisfying to be digging down into the beautiful earth, imagining a place for water.

Advertisement

Pond Dig, part three

I had a helper yesterday for digging the pond. My friend Sylvia came by in the afternoon and the very first thing we did was drag the pond-liner in its box from near the house to back closer to the pond. (You can see it in the picture, behind the wheelbarrow.) That would have been enough help all by itself–so heavy! But then we took turns digging, hauling, and resting nearby. We got a lot done, and also enjoyed a rare COVID-time visit, walking around the yard and in the woods, looking at birds and plants.

Sylvia standing on the planting shelf, while digging in the pond!

So here is what the pond looks like now, in layers. The first layer down, about 8-10 inches, is for the planting layer. The next layer down, maybe 18 inches, is for a step layer–part of that I might take away as we go along, but some will remain to be a step into the pond going forward. In the middle, we dug to about 2 feet down, as measured with this string set-up I created. My aim is to go three feet down in the middle.

Pond layers dug out.

But then we came upon a problem that wasn’t mentioned in the Building Natural Ponds book by Robert Pavlis. Water started to seep up from the sandy soil. We are actually at the time of year when vernal pools abound here in Maine. We have a ditch way back behind the edge of our property and the properties next door that fills during spring rains. And we had an inch of rain last week, though generally it has been a dry winter. Does this mean we can’t go any deeper for a lined pond? Or do we need to wait until it is a bit dryer as the days go by? Will it mess up the pond to have water under the liner at the bottom? Or does it not matter at all? I am going to ask my questions in the Facebook group Building Natural Ponds, and see whether I might find some answers.

Water seeping from the soil in the bottom of the pond.

Maybe the pond just wants to be a pond so badly, that it doesn’t want to wait, lol. Meanwhile, I am going to rest today from digging, and more rain is coming tomorrow. So we will see. If you have any wisdom about this, I’d love to hear from you.

Pond Dig, part two

More on my adventures in digging a small pond! Yesterday I finished digging the first layer of the pond, down to the level of the planting shelf, about 1 foot. I checked whether it was fairly level after I was done. And then I did some math to figure out what 1/2 to 1/3 of the total surface area would be, which is the best size for the planting shelves.

For those who might wonder, here is how I worked on that: Using a website that computes circle area, I found that for my 11′ by 11.5′ pond, the total surface area was about 100 square feet. If I made a planting shelf one foot deep, the resulting circle would be 9′ by 9.5′, with a surface area of 67 square feet, meaning the planting shelf included 33 square feet. I was surprised that just 1 foot at the edge already brought it to 1/3 of the area. Doing two feet would leave a circle of 7′ by 7.5′, or 41 square feet, with 59 square feet for planting. So I took half of that, and decided to do 1 foot wide on one half, with 2 feet wide on the other half, approximately. Even though the math is exact, the actual pond will be less so, but it gave me an idea of what I was aiming for. I marked it out with white flour, including a spot for a step, that would be dug to 1 more foot down, to make it easier to get in and out of the pond center.

Pond layer one, with my rough markings for planting shelves and a step

Meanwhile, I’ve heard back from folks who have bits and pieces of carpet–I had asked for at least 2 feet wide, and the responses have ranged from 2′ by 2′, to a medium size carpet. I picked up some yesterday, and will do more today. It has been fun to have these interactions with folks, limited as they are–so rare for me in a time of COVID. Since I don’t have a truck, the smaller pieces actually work because they fit in the back of my car.

Meanwhile, the pond liner was delivered yesterday too! A very heavy box was dropped in our driveway by UPS. (I think I remember that it was going to be 138 pounds) Unable to lift it myself, or even together with Margy, she had the idea to roll it onto a larger piece of cardboard (which we always have in our garage for various garden projects) and then we could pull that cardboard together along the driveway to a better spot–and it worked. So it is waiting by the side of our house. It made me realize, though, that when I actually install the liner in the pond, I will definitely need help from a few friends.

Four years ago, the pond was part of our original plan for our permablitz–when twenty-some people came by and helped us with all manner of garden projects. (If you are curious about that, you can find more here.) It was such a humbling and gratifying experience to be gifted with the energy of so many to begin to create this permaculture garden where we live. With everything else going on that day, it was decided that the pond would be too much to attempt. But it is wonderful to remember how community enables us to live better with our land, how the gift of each other’s time and energy enriches all who participate. With COVID we’ve been on our own so much, and yet even so, we rely on the help of others–delivery people, for example, and neighbors who have picked up needed items in stores. It has brought us closer together with our neighbors actually. We are so programmed by our society to try to be self-sufficient. It is hard to be reminded of our need for each other–and yet that need is a blessing.

Meanwhile, it was also a blessing to be digging on my own, outside in a beautiful sunny day. Squirrels were playing, birds singing, daffodils shining bright yellow, and the cherry and peach trees are beginning to blossom. I started on the next layer of the pond. Our soil is very sandy and compacted–we had an inch of rain fall on Friday, and none of it stayed in the depression that I had already dug. So the recommendation is to slope the sides as we go down so it doesn’t collapse. Step by step, and with a little help, I think it can be done.

Digging begun on second level.

“Ghost” Trees

Peach (in front) and cherry trees treated with Kaolin clay.

Yesterday, I prepared a mix of kaolin clay and water, and sprayed all the branches of the peach and cherry trees in our little orchard. This is an organic solution to curculio insect pests, among some others. Now they are totally white and look like ghost trees. The leaf buds are starting to open on the cherries, and flowers will be here soon. Last year, our peach tree produced many peaches, but they were almost all destroyed by pest bugs. We got to eat two peaches. (They were delicious by the way.) We had somehow assumed that it might take at least a year for bugs to find them, but bugs are smart. So it was a useful lesson in observation. But this year, we hope to actually eat some peaches.

I have been committed to figuring out how to protect them organically. This spring I started reading once again The Holistic Orchard by Michael Phillips, which has been my guide during my fruit-tree food forest adventure. Each spring I forget what I did the prior year, having only a few trees and a few times to do any part of this project. This time reading, a few more ideas stuck further into my brain, and I found a few new ideas too. First of all, which I didn’t forget, was to try to make sure they have all the nutrients they need in the soil. Phillips had a section about how to interpret soil tests, and last fall, Margy did a soil test for the peach tree bed. Since the fall, I have added more compost, seaweed, some rock dust and green sand which are all long-term nutrient boosters. I also ordered some potassium sulfate of potash because the soil test said the soil was low in potassium, and some alfalfa meal to add some extra nitrogen which was also low. I will add those once the trees are more in flower.

In prior years, I have done the holistic sprays that Phillips recommends, and now I am trying to create my own timeline for which ones come when, so that I don’t have to figure it out each time all over again. I love this book, but it is not well organized for beginning orchardists. Vital information is scattered across various parts of its 400 pages. It is the book of someone who knows way too much about all aspects of orchards for a beginner to have much of a chance. His primary focus has been apples, and other fruits each have their own sections. Still–re-reading it each year seems a good way to go.

I do have to laugh though, because I found the key piece of information I needed for my peach and cherry trees only in a footnote–a footnote! And that footnote said: “Massively coating stone fruits [cherry and peach are stone fruits] with multiple applications of refined kaolin clay for curculio is less than ideal once fruit begins sizing in earnest. Cherries bloom before apples, and with far less leaf showing initially. Surround [brand name of kaolin clay] applied at this critical juncture on the just-about-to-pop flower buds delivers a message to this pest to move onward to other prospects. Curculio makes its way by crawling, particularly early on when temperatures tend to be cooler. The main route to developing fruit is by way of the limb highway, and thus the reason for thorough coverage on the branch structure of the tree. Two applications going into bloom will do the trick in a warm spring, with an additional application as soon as petal fall begins probably necessary in a cooler season.

See what I mean? But yesterday, as the buds on the cherry were just starting to open, I sprayed it with kaolin clay, and then I repeated it once that had dried. Now they are white, and I hope they are protected for now.

It was lovely to be outside. In between applications I did some raking and some lying in the hammock, and eating my lunch under the patio umbrella. What a great way to celebrate Earth week.

Spring Energy

The first dandelion of the season! We love dandelions and so do the bees.

Wow! It feels like spring is finally here. Last week was a flurry of activity in our yard, and I had the energy to do it! And it was warm and sunny! We had a timeline. On Tuesday, all day I was sifting the remains of the old compost pile, and putting it everywhere–in the new raised bed, on the hugelkultur mound, the asparagus beds, under many of the fruit trees, the old potato patch, and an area near the baby apple trees in which I hope to plant zucchini this year. We have had to sift the compost because roots had worked their way into the pile from the edges, including invasive bittersweet which we do not want to spread around the garden.

The goal was to completely empty the pile, because on Wednesday we were getting a new four cubic yards of composted manure from Wilshore farm. So I finished up Wednesday morning, and Wednesday afternoon we got our delivery. Then Margy and I were using shovels and rakes the rest of the day to slightly move that pile so it was all situated on top of old carpet, with at least a foot of clearance around the edges–so no more roots.

Composted manure on old carpet.

On Thursday morning, I finished up with what was on the edges, and spread the remains over the nearby grassy areas. On Thursday afternoon, Dan from Blue Ox Tree Service was coming to cut down three Norway maples along the fence between us and our neighbors. While we hate to cut down trees, we also have been trying to remove invasive plants, and Norway maples are invasive here. They grow like crazy and spread their seeds everywhere. Both Margy and I each had a moment with those trees earlier, to apologize for needing to cut them down, and thanking them for the shade they had given, and say goodbye. We let them know that their wood would stay in our yard to benefit the other trees in the garden.

Dan up in the Norway Maple

It was amazing to watch Dan climb the trees and with a system of ropes and pulleys balance himself on the tree, and cut it from within. We really like Dan, who has delivered free wood chips to our yard many times in past years. He is very tuned into permaculture, and told us he has an arrangement to deliver wood chips to Cultivating Community gardens this summer. In fact, our whole intense timeline of last week was based on the fact that he was going to leave us a pile of wood chips from the trees, and once that pile was there, a truck couldn’t get through to deliver compost where we needed it to be.

Wood chip pile on the left, compost pile on the right covered with blue tarp.

So here are our wood chip and compost piles, all set up for soil enhancement and mulching for the season. The area along the fence has opened up to offer more morning sun to the orchard–you can see four somewhat scraggy spruce trees remaining, plus a skinny red maple and oak near the right which will have more room to grow.

Now, the growing season is fully begun. I was amazed that I was able to put in so many hours of outside work each of those days–I am thinking it has something to do with the surging energy of the earth in spring, the warmth of the sun, and also with drinking iced licorice tea while I was working–a great herbal energy booster. I am remembering how exhausted I felt last fall, how much work the garden was during the long summer, and yet, spring brings new excitement and new energy, even to me with my chronic illnesses that can get in the way. May it be that way for you too!

Raised Garden Bed, Part 2

After putting in the structure of my cedar raised garden bed, I have been gradually filling it with layers of compostable material along with the soil I had taken out. This is called “sheet mulching” or “lasagna gardening” and is a great easy method to enrich the soil. In its most complete form, sheet mulching includes laying down cardboard or newspapers on top of whatever is growing on the ground (lawn, etc.) without any digging required. But since I wanted to have a deeper root zone in this raised bed, I did weed the soil and dig down deeper. Autumn is an excellent time to sheet mulch because the bed will have all winter to decompose and be ready for planting in the spring.

This is a form of composting in place, so you alternate layers using amendments rich in nitrogen (called “green”) or carbon (“brown”), but it also depends on what you happen to have in your yard. A basic permaculture principle is that waste is just nourishment for another part of the life cycle. So we are taking “waste” and giving it a chance to grow food next year. We have lots of leaves in our yard, so that is an important source of “brown”, and we also live within a half hour of the beach, so we use seaweed gathered at the shore as a source of “green.” I had a chance to go to Kettle Cove on Sunday to gather a bunch.

Kettle cove beach with seaweed.

Here is my list of layers from the bottom (5 inches below ground level) up, with some photos along the way:

  • soil from the site
  • rock dust: I added some handfuls of rock dust, which adds trace minerals (I had collected a bucket-full a few years ago from a local quarry.)
Rock dust over soil in raised bed.
Rock Dust over soil
  • a bit of old seaweed, collected earlier this year.
  • leaves mixed with a little bit of grass clippings, from Margy’s leaf collecting.
  • a few branches (I remembered this from my hugelkultur adventures) These are good for water retention, slow release of nutrients—I just added a few, and then buried them in the leaves—I could have done a lot more, but also didn’t want to limit the roots.
leaves, branches
  • more soil
  • After my trip to the beach, I added more fresh seaweed, a generous layer of it: seaweed is a great source for nitrogen, potassium, phosphate and magnesium, and many trace minerals. Note, I also added the second layer of cedar planks to bring it to its full height of 11 inches.
Seaweed in the raised bed.
  • more dried leaves with a little bit of grass clippings
  • composted coffee chaff (which was in a barrel we kept next to our compost bin to add after kitchen scraps: after a couple years it composted itself!)
  • more soil
  • a couple inches of composted manure: we have a pile of it from last year, but we have to sift it because it has become full of roots.
  • green cuttings from garden cleanup.
Garden cuttings over compost.
  • leaf mould from leaves left in a barrel for a couple years
  • more leaves to top it off.

And today it is complete! The rest will be done by winter, and soil creatures and time.

Raised Garden Bed, Part 1

I have to laugh at myself. After hardly having enough energy to keep up with the garden all summer, I took on the idea of creating a new raised bed. It was a 3′ by 6′ by 11″ kit with eight planks of cedar and 4 metal poles to insert in holes at the corners, but I bravely decided to add hardware cloth underneath to protect against little tunneling creatures. (And on that note, I managed to catch a glimpse of a tunneler in the act–turns out to be a tiny star-nosed mole. It seems to especially like to burrow under our wood chip paths. But apparently they are not huge hazards to the garden, so that is good to know. They eat grubs and other insects, not roots.)

So everything arrived–kit, hardware cloth, staple gun, staples–and I started to figure out how to be able to assemble the 4 foot wide hardware cloth to the boards so it would go 5 or 6 inches into the ground to make room for deeper roots. After a lot of math, several scratches on my hands, and many staples, step one complete:

Hardware cloth stapled to cedar planks.

Margy helped me move the whole thing over to the 3 by 6 hole that I had dug earlier.

Hole dug in ground with dirt in two wheelbarrow on either end.
Hardware cloth and planks over hole.

I assembled the bed by bending in the corners of the hardware cloth so that the ends of the planks met, and then I secured the planks with the metal poles. But it didn’t fit into the hole I had dug–the hole was too shallow. So I tilted the whole assembly over to stand on its side, while I did more digging, piling the extra dirt on a piece of cardboard on the side.

Cedar planks and hardware cloth assembled and on its side next to hole

I repeated this step several times until finally everything fit. Hurray! I added the dirt from the cardboard into the cedar bed, and called it enough for one day. I still have to add the second tier of cedar planks, and all the contents–but that can be a new post.

Cedar bed in/on the ground

Meanwhile, somewhere in the middle of it all, I was happy to take time to collapse in the hammock with Margy. I am sore and exhausted, but it was a good day.

Two pairs of feet side by side in the hammock.

Hugelkultur, part one & a half

Time to do the next steps for our new hugelkulture bed, but I wasn’t sure what kinds of materials to put on first. After doing more research online, many suggested that soil plus nitrogen rich materials like cut grass were next. But then I realized I needed to back up a bit. In order to stabilize the mound, it was recommended to put soil in between the cracks and crevices formed by the logs on the bottom. So I took off the smaller branches I had already placed on top, to expose more of the logs underneath.

Also, people had mentioned having a problem with the soil falling off the outer part of the mound, and one suggested remedy was to put lots of sticks angled out from the mound to help to stabilize the organic material and soil that will eventually cover it all. So after I took off the smaller branches, I started replacing some of them at a different angle.

hugelkutur sticks

Finding soil to put on the bed is no problem for us–in fact, it is a great help for our dream of a future pond, which we had included in our original permaculture design. One of the challenges for a pond is having some place to put all that dirt. So it has been on a way back burner. Today, I dug up about a half-wheelbarrow full of dirt–the dirt was very wet from recent rains, so that was actually the limit of what I could lift in the wheelbarrow.

Future pond soil

I brought it to the mound and started putting it into all the crevices, (after making sure to pull out any tiny red bittersweet roots.) The mound needs several more loads of dirt, but my own physical limits intervened. For some reason, lifting heavy things is very challenging for my chronic autoimmune illness, and triggers my fatigue response. So I sat outside in the sun for a while, but reluctantly came in after watering the mound with our garden hose. Tomorrow will be another sunny day.

It is hard to have an idea, a vision of this hugelkultur mound, and not be able to just go out there and get it done. Usually if I push myself one day, I have to rest on the next day.  And Margy has her own limits. So after moving all those logs yesterday, it was a stretch to do anything at all today. But I have been slowly learning to honor the boundaries of what my body can do, and take things step by step, in whatever timeline is necessary. It still feels so good to be outside in the garden.

Future blueberries

Blueberry bed complete.jpg
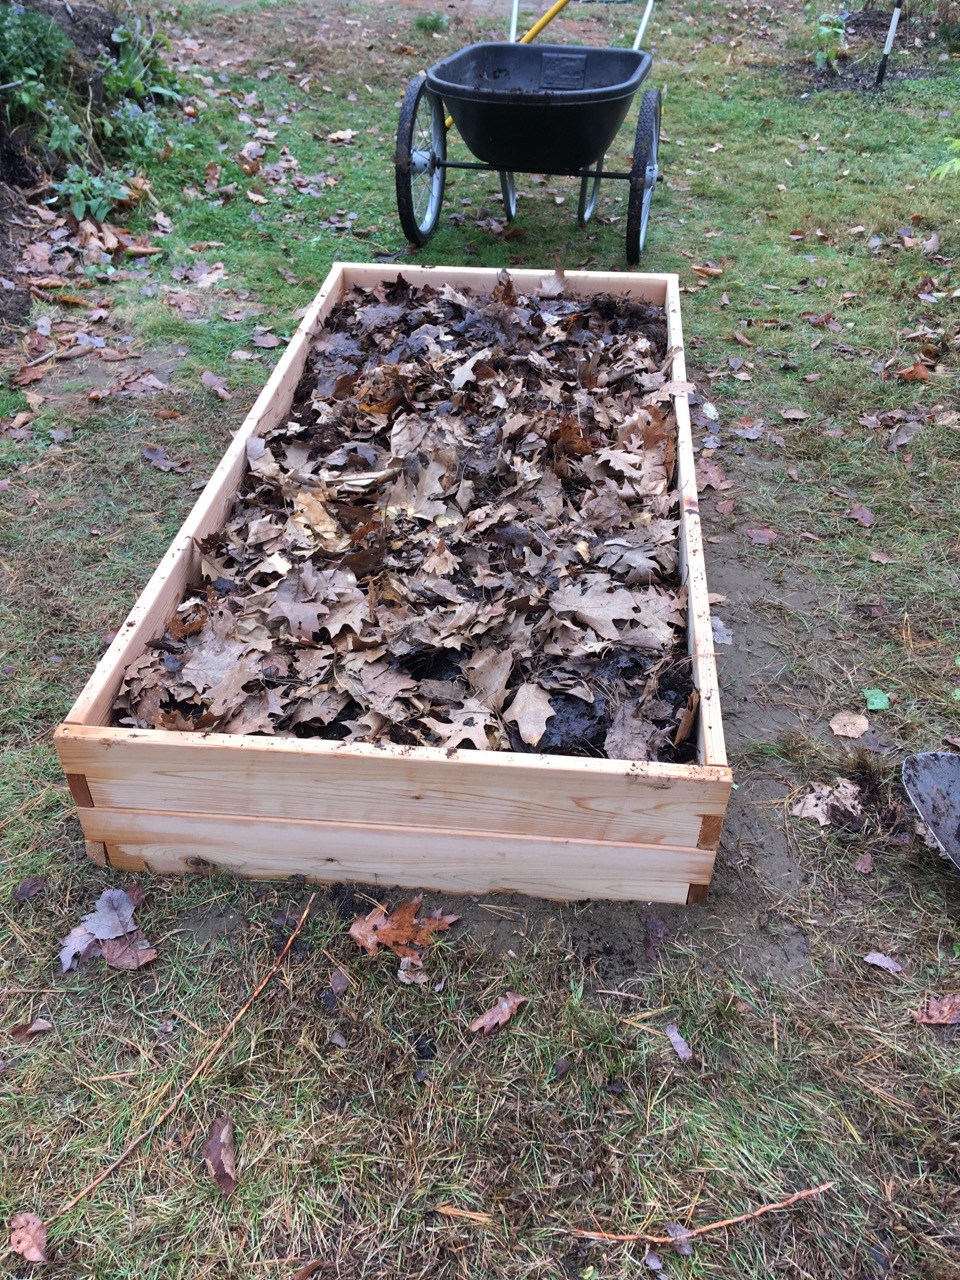
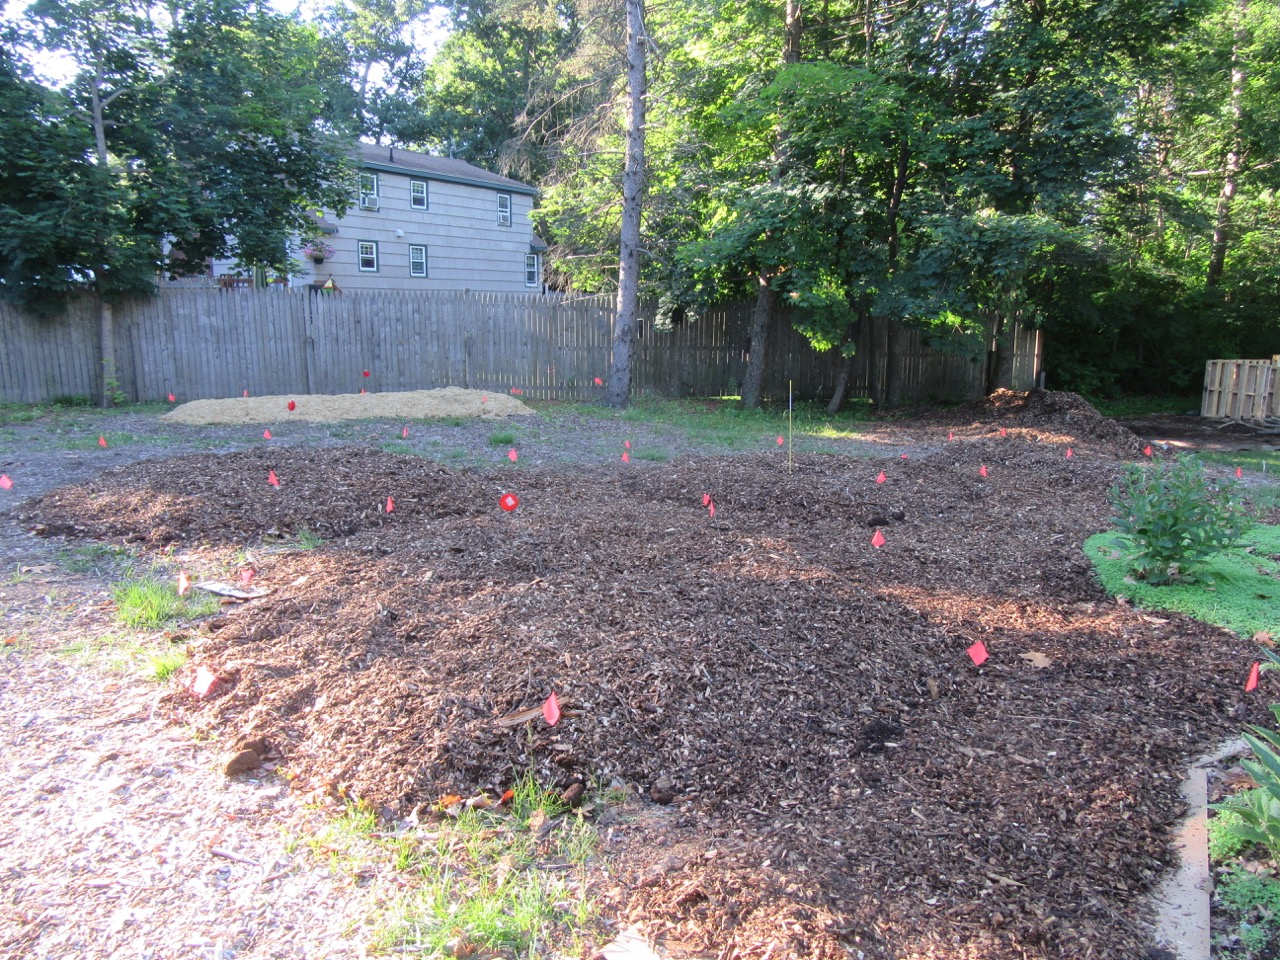
The last few days I have been working on a garden bed for two future high bush blueberry plants.  This was the toughest project so far, in terms of physical stamina.  I was following the guideline of Michael Phillips in the Holistic Orchard.  His first step is to dig a bed one foot deep and 3-4 feet in diameter per plant, (so for me that meant about 7-8 feet long and 3-4 feet wide).

Blueberry bed-bittersweet rootsOnce I had dug the hole, I came upon bittersweet roots, so then spent some time strategizing about what to do for that.  I eventually decided to clip them off where they emerged, and then line the sides of the hole with cardboard. Since I was also making paths around the bed, I bent the cardboard so that it covered the path as well.

Then, the next steps are to fill the hole with 50% peat moss, 40% soil from that you had taken out, and 10% compost.  Peat moss is somewhat controversial (because of environmental questions raised about its extraction), but I did some reading and learned that the percent of peat moss taken in Canada is very tiny compared to the amount of peat moss bogs they have–so in that context it might be considered renewable.  I had to go back to the store to get more stuff, because it was hard to estimate how much I would need.

Blueberry bed-half done
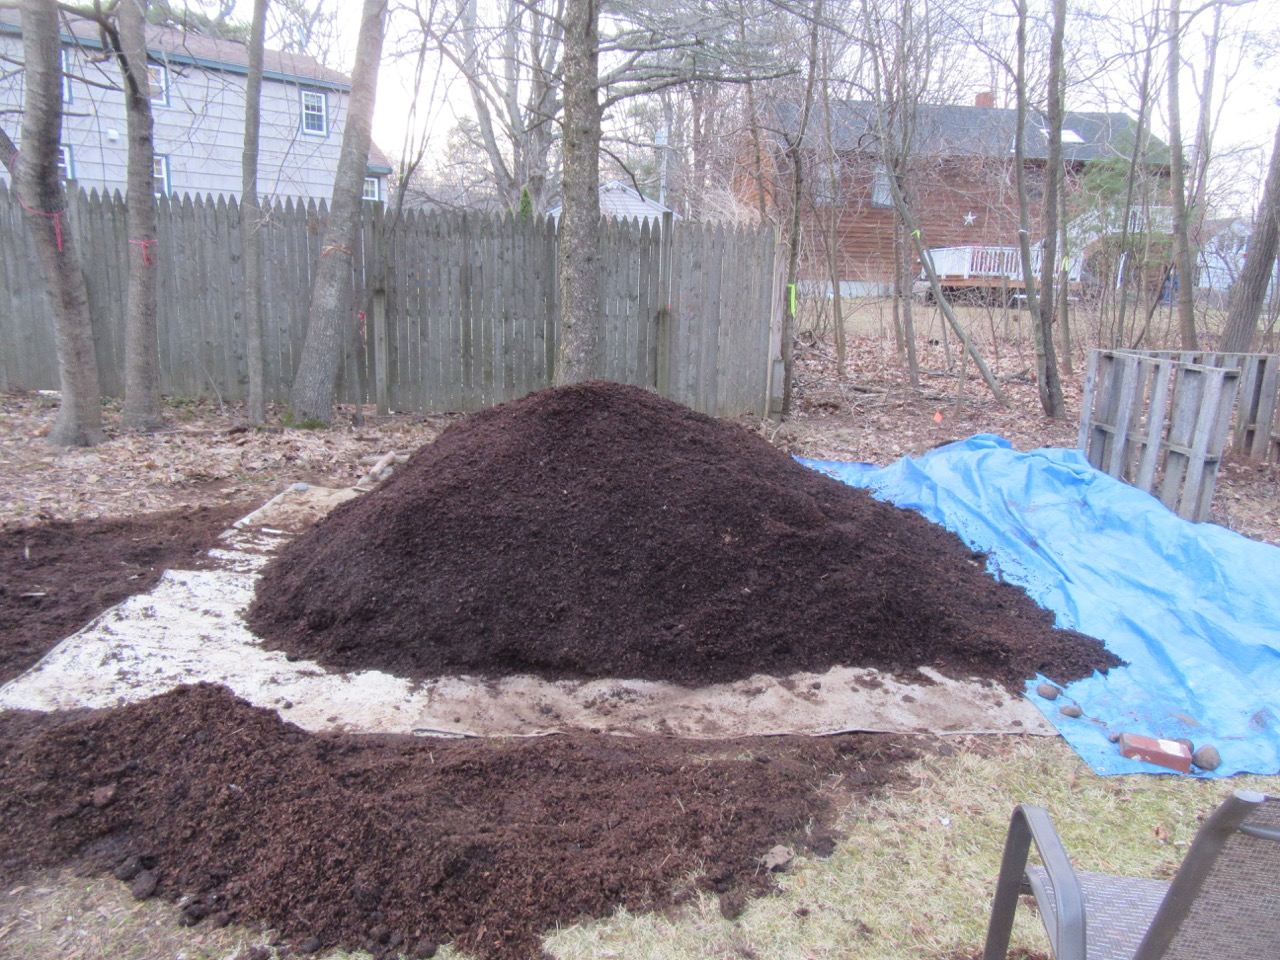
And it is a lot of work to dig out a hole, then fill it with other stuff, and then “stir” it around, which really means turn the soil over and over.  I am glad I only have to do it once.  So I would do what digging I could, and then stop and rest for most of the day, and return to it in the evening if I could.  After the peat moss, soil, & compost mix was in, I added 2 cups elemental sulfur, 4 cups green sand, and 2 cups rock phosphate, all organic nutrients.  This whole mix is meant to create the type of soil that blueberries love, with an acid leaning ph, and the nutrients they need.  (You may notice that I purchased more composted manure, because we used up our big pile.)

I topped it off with a few inches of pine bark mulch that is also good for blueberries, and then some pine needles that Margy had collected last year.  After that, I hauled the rest of the unused sandy soil over to our materials area, and did the paths around the bed with more cardboard and hardwood mulch.  And watered all of it well.  Now it is all ready to do its own thing for several months:  the plan is to plant blueberries in the spring.

The Layers of Community

Before-marked for fruit tree beds

[Before–Growing beds marked with flour and flags]

On Saturday, we hosted our Permablitz! (See “more before” photos here.)  Over 20 people came to our yard and worked together on projects such as installing rain barrels, building a composting system from pallets, building a fire circle, and creating five more  growing beds for future fruit trees, raspberry bushes, & hazelnut bushes, and one bed for flowers & herbs.  We also got the first shovelfulls dug for a pond.

Opening Circle-Sylvia, Cathleen, Ali

[Opening Circle]

At the end of the day, I got teary-eyed with the sense of Gift.  The generosity of so many individuals coming together and creating something so beautiful and full, helping us to realize our dreams for this piece of land was deeply moving.  There is something about this giving and receiving of human attention and wisdom and care, that feeds our hearts. Much of our lives are shaped by transactions—we pay a certain amount of money, and receive a product. Or, we put in so many hours and receive a paycheck.  But giving and receiving freely and generously touches something much deeper. Giving and receiving must trigger deep neurotransmitters in our internal chemistry, sparking a profound sense of well-being and belonging.

I also realized how many layers of community are involved in such a project.  One layer is this community of people who care about the earth, and who come together to give and receive, to learn, to share, to grow, to get to know each other.  People connections are made.

Another layer is the community of the soil.  During the blitz I was mostly working with several others on the project for creating new growing beds.  We were adding nutrients through sheet mulching so that the soil could create a thriving fertile community.  I have learned so much about the variations in soil communities from the book The Holistic Orchard by Michael Phillips.

What a food forest needs, what fruit trees need, is soil whose fungal community is stronger than its bacterial community.  In contrast, annual vegetables and flowers and grasses prefer soil with a stronger bacterial community.  A bacterial community is enhanced by tilling the soil and incorporating organic matter by turning it into the soil.  A fungal community is enhanced by no tilling, but rather adding organic matter on the top of the soil to decompose, as it happens in the forest. (Similarly, compost that is left unturned will generate a stronger fungal community.)

Forking the beds Cathleen

[Cathleen forking the soil]

We prepared the soil by aerating it with garden forks–since it had been rather compacted.  We added some granite dust for mineral enhancement, then put down a layer of cardboard to kill grasses and weeds.

Raspberry Bed-manure & chaff Mihku & Heather

[Mihku & Heather adding manure and chaff]

Then, we added chicken manure, coffee chaff, seaweed, leaves, grass clippings, composted manure, and a really thick layer of deciduous wood chips.  We were able to get a delivery of 8 yards of wonderful ramial deciduous wood chips–these are chips which include lots of thin branches, which have more lignin content that is not yet woody.  The wood chips are the most important part of enhancing the fungal community.

We also made several pathways with cardboard and wood chips, and I will complete those bit by bit in the next days.  Now, the process works on its own–I add some water or it gets rained on–and the microbes will work together over the next several months (and years) to create a thriving soil community.  We will plant trees and bushes next spring.  My friend Roger Paul said that the Wabanaki word for “soil” means giver of life.After-Fruit Tree & Flower/Herb Beds