Pond: Little Deck

Photo: Pond with deck

Yesterday, I installed a little deck on the edge of the pond! This idea was an evolving process–at first I was going to put a large slate stone at the spot on the surface that leads into the steps inside the pond. But working on the pond during the last several weeks, I discovered that slate gets really, really hot in the sun. So then I was trying to come up with something that could serve as a top step that wouldn’t get hot.

Happily, I found an upcycling solution! In our garage, there were six wooden decking boards from the previous owners that were stored on rafters above the cars. They were very heavy, about six feet long, and some of them were attached to each other, but I was able to get two of them down. The boards were painted brown, and they too got very hot in the sun. But then I found some older paint cans in the basement. I did a prime coat of white on one day, and then a coat of light gray concrete paint, which has some waterproof qualities, two days later. Yesterday, I drilled holes and screwed them together with small boards I had also painted.

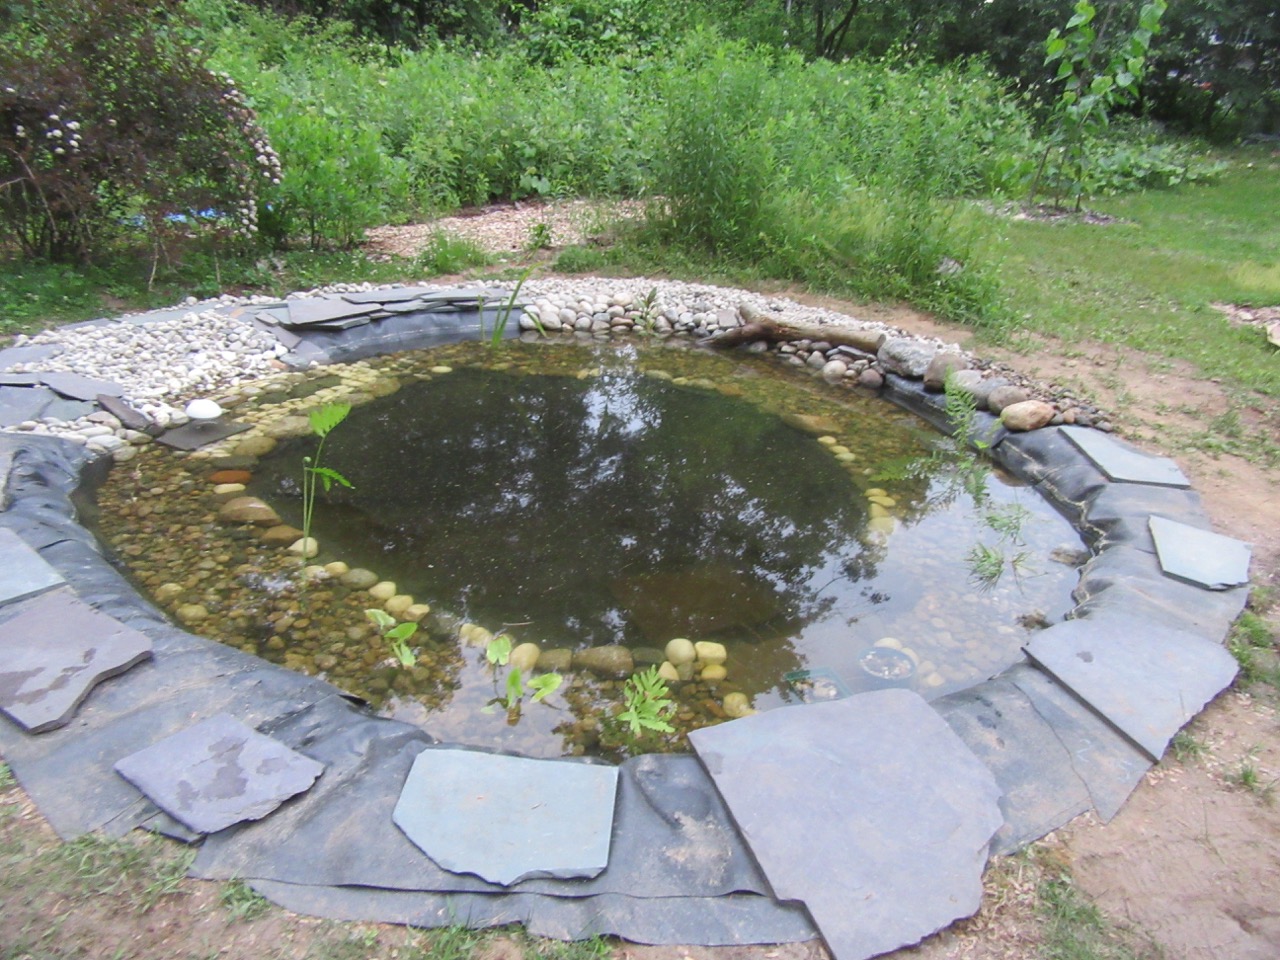
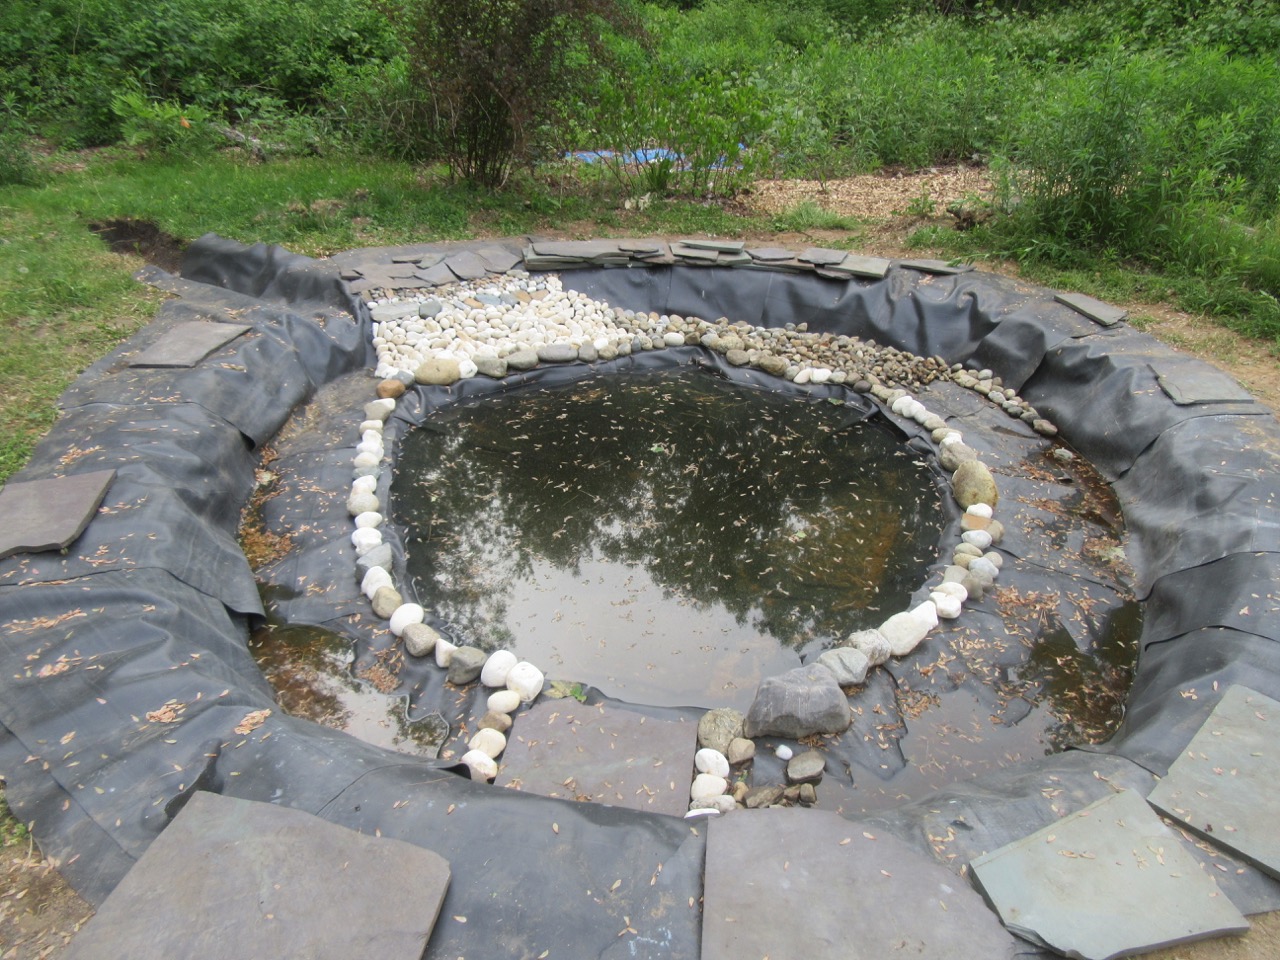
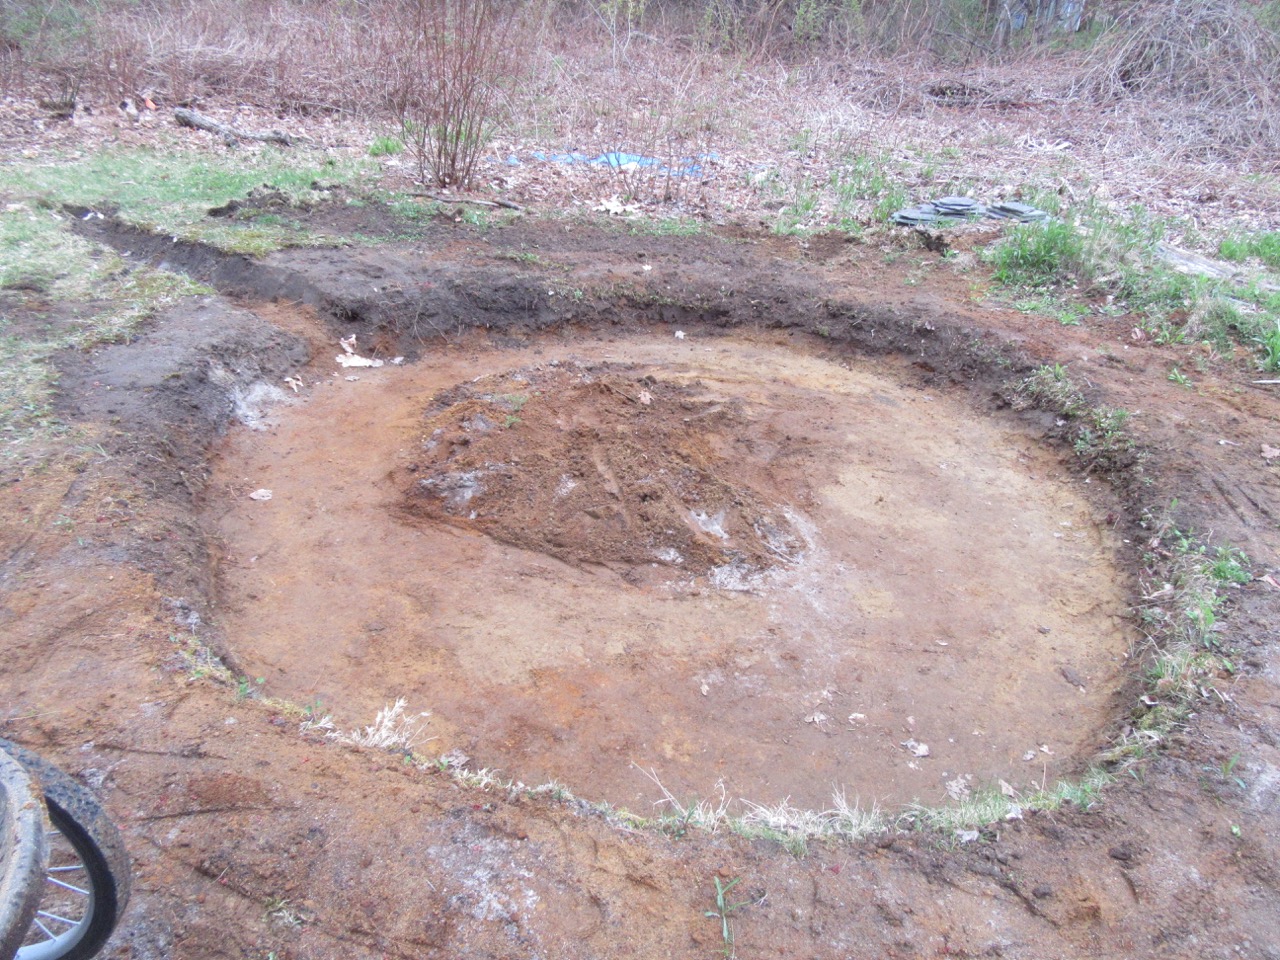
Everything was a bit off level–the boards, the ground–so I installed them using small stones underneath to stabilize things. Voila! We now have a top step, which is also a little deck where we can sit on the very edge of the pond, with our feet in the water. And after positioning a few more stones, and slate rocks, I can now say that the surface level of the pond is virtually complete. I still need to find some more five inch stones to line the rest of the vertical sides under that area, but if you look at it from this side, you can’t see any liner showing.

The tiny plants are starting to grow a bit, the pond lily rhizome that I positioned on a lower level sent up a tiny leaf all the way to the surface. I’ve topped up the water level with water from the rain barrel once. I plan to add more small stones to the planting ledge to give plants more to hang onto. This morning it looked like someone had messed around with the pickerel rush plants. I still have to finish the overflow channel. It will all continue to grow and develop as the summer goes on… hopefully the plants will start to take over half the surface of the water. But what a happy moment today!

Photo: Pond lily leaf, about one inch in diameter

Pond Progress

Photo: The pond on June 11

I am slowly adding stones and plants and developing the top edge of the pond, to cover up all the liner. I did a minor adjustment to the overflow channel to lower the water level by about an inch, and added some soil (underneath the liner and layers) to an edge that was a little bit lower than other parts. I’ve been using my pile of small stones for the edges, but stabilizing them behind larger stones. I decided to use the larger stones to also cover the vertical slope between the planting ledge and the top. This was in the original plan, but I didn’t think I would have enough stones to do it. And I don’t. The other day, Margy and I went to another rural road and brought home another batch of larger stones from the side of the road. But it doesn’t take long to use them up.

By the way, in the background, from left to right, you can see a ninebark shrub in bloom, a summer sweet shrub, and a little elderberry that’s barely visible. I am trying to start some hazelnut bushes from off shoots of our big ones. Also, there is a lot of goldenrod that will flower later in the season, and on the far right back, our mulberry tree–which after a couple rough starts is finally doing better this year.

Back to the stones for the pond, even though I don’t have enough of the larger stones, it seemed smart to do as complete a finish as possible, section by section. Here is a close up of the most completed section, behind the cardinal flower, where I also incorporated an old piece of a branch. I am enjoying this design process.

Photo: pond detail with stones and log

I also ordered and received some more plants–this time I got some pickerel rush (or pickerel weed), Pontederia cordata. This native plant will grow 2-4 feet tall and have blue flowers. I ordered five, but received eight little root and stem starts. So then I decided to rearrange the arrowhead plants, moving them closer to the “front” from where the photo is taken, and where we’ll sit to watch the pond. I planted the pickerel rush mostly where the arrowhead had been, on the back left, and then put a couple of the smallest ones in front of that log. Here is what it looks like right now, and this is the largest one. It takes faith and imagination to see them growing and flowering in the summer and fall.

Photo: Pickerel Rush held in place in the water by stones

In other news, I have twice seen (from my window) a crow walk up to the pond and get a drink of water. Tonight I also saw a few little water bugs of some kind swimming around. Animal life is starting to arrive. The other day, when it was so hot, there was some green algae in the water, which is to be expected until the plants grow bigger–but then it disappeared again today. Time to think of another place to find some more of the larger stones. It all feels magical.

Pond Stones, Stones, Stones

Finding stones for the pond project is proving to be an adventure. It is raining here today, and was yesterday too. The days before that I was able to place all the stones I had previously gathered onto the pond planting ledge. I also bought some white stones in small bags–they were supposed to be 3 to 5 inch stones, but at least half were much smaller than that. Maybe not such a great buy. But I had enough to finish a ring around the center of the planting ledge. These stones will be large enough to stabilize smaller stones behind them. Once the pond is filled, all of them will be below the water.

Pond with stones in a ring around the ledge, plus “beach.”

I worked on the “beach,” which is an incline for critters to be able to reach the water easily. I did it early in the process because It seemed like this might be the trickiest part, and I wasn’t wrong. In the photo it is at the back, with mostly white stones. I had gently placed each stone one by one. However, I am thinking I might need to redo the upper part of it because when I imagine little critters walking on those stones, it seems like they are not stable enough–the incline being slightly too steep. But to redo it, I’ll have to move the upper stones, and go beneath the liner and the carpet, and take out a bit more soil so the slope is more gradual. When the pond is filled, the water will cover the white stones and come to the level of the row of larger stones behind them.

Close up of pond “beach”

After I finished the (imperfect) beach, I put all of my smaller stones on the ledge to the right of the beach. As you can see in the first photo, they didn’t cover very much. So I will have to buy more small stones for the planting shelves, but I am now looking at 1-2 inch round stones, not “pea stones”. I discovered that a nearby nursery has such stones available in bulk–but that means either borrowing or renting a pickup truck to be able to collect them. I can get a half-yard of them for a good price, which should do it. It is just a big project to rent a truck, get stones, unload them at my house, and return the truck. I don’t mean to complain! If anyone locally (Portland Maine) has a pickup truck (with an open bed) who is willing to loan it, can you let me know? For some reason, this part feels challenging to me.

So, in the meantime, last night I suddenly had an idea of where I could find some more bigger stones. In our old neighborhood there were rural roads with no houses nearby, and I thought I remembered seeing stones on the side of those roads. Today before the rain came, I drove over there with two intentions. Get some stones, but also, look to see if the lady slipper plants we use to find in the woods there were still blooming. And they were. And I did get some good stones by the side of the road! I have a feeling this gathering of stones will continue for some time.

Pink lady slipper

Pond decisions

Sometimes the mental work is as hard as the physical work of building the pond. If you’ve been following along with this project, you know that after digging the hole, after putting down old carpet to protect against invasive bittersweet roots, after placing the underlayment and then the pond liner, we started filling the pond with water a few days ago. That felt so great! But then I felt stuck. The Building Natural Ponds book, by Robert Pavlis, which has been such a great guide to this whole project, suggested using old carpet as an “overlayment” on the planting shelves, to protect against the stones that were to go there. But I had run out of most of the carpet, and also had misgivings about putting old carpet into the actual water of the pond. So what to do?

I thought and thought and then posed the question in two Facebook groups–the Building Natural Ponds group and the Northeast Permaculture Network. Then, I went outside and started gathering all the stones I’d been saving for the last five years from around the yard. I had some in five gallon buckets, and some in a pile next to the garage where violets had decided it was the perfect place to bloom. I had to dig under the roots to get all of those stones. But violets are very prolific in our yard, so I wasn’t worried about them. I also brought back the final bits of carpet I had–2 by 2 squares made of eco-friendly nylon.

Photo: Gathering all the stones to use in the pond.

Once that was done, I came back inside and checked my Facebook posts. I had gotten a variety of answers and suggestions from folks, and finally came up with my answer. I would use extra pond liner as an overlayment. Robert Pavlis had thought that idea would work well, so that gave me the confidence to do it. Some folks didn’t bother with any overlayment, but it gives just that added layer of protection against cuts or punctures from stones or little animal claws. So I went back outside, and I bravely made the first snips to cut off the extra pond liner around the edges of the pond. Because the pond wasn’t quite as deep as originally planned, there was quite a bit of extra liner.

Photo: extra pond liner

I started cutting it up and laying pieces of it all around the planting ledge, starting with the spot that I hope will be a little incline “beach” for animals to be able to approach. And as it happened, I had just enough liner to cover everything I needed. Then I started putting some stones into place. I did that in bare feet, and an old carpet square worked as a place to wipe off my feet before getting onto the planting ledge. We had some slate pieces that we found here when we first moved here, so I am hoping to use them around the edges of at least part of the circle. But I am also trying out using them for steps into the pond. Once the pond is full of life, it will be slippery, so maybe not. Decisions for later.

Photo: pond with liner overlay done, and stones begun to be placed.

I worked into the late afternoon, but finally came inside for another commitment. Today I am feeling all that work in my body–sore hands, sore muscles. I am eager to continue laying the stones I have–and then I will see how many more I will need. More decisions. The basic idea is to put larger stones around the center of the planting ledge, and larger stones near the outer ring of the planting ledge, then pea stones to fill in–those will be the growing medium for bacteria that clean and filter the water and aquatic plants that clean and filter the water. But as with this whole process, I am taking it step by step. I think if I had really known how much work it would be, I might not have had the temerity to begin. But here I am.

Pond Dig, part three

I had a helper yesterday for digging the pond. My friend Sylvia came by in the afternoon and the very first thing we did was drag the pond-liner in its box from near the house to back closer to the pond. (You can see it in the picture, behind the wheelbarrow.) That would have been enough help all by itself–so heavy! But then we took turns digging, hauling, and resting nearby. We got a lot done, and also enjoyed a rare COVID-time visit, walking around the yard and in the woods, looking at birds and plants.

Sylvia standing on the planting shelf, while digging in the pond!

So here is what the pond looks like now, in layers. The first layer down, about 8-10 inches, is for the planting layer. The next layer down, maybe 18 inches, is for a step layer–part of that I might take away as we go along, but some will remain to be a step into the pond going forward. In the middle, we dug to about 2 feet down, as measured with this string set-up I created. My aim is to go three feet down in the middle.

Pond layers dug out.

But then we came upon a problem that wasn’t mentioned in the Building Natural Ponds book by Robert Pavlis. Water started to seep up from the sandy soil. We are actually at the time of year when vernal pools abound here in Maine. We have a ditch way back behind the edge of our property and the properties next door that fills during spring rains. And we had an inch of rain last week, though generally it has been a dry winter. Does this mean we can’t go any deeper for a lined pond? Or do we need to wait until it is a bit dryer as the days go by? Will it mess up the pond to have water under the liner at the bottom? Or does it not matter at all? I am going to ask my questions in the Facebook group Building Natural Ponds, and see whether I might find some answers.

Water seeping from the soil in the bottom of the pond.

Maybe the pond just wants to be a pond so badly, that it doesn’t want to wait, lol. Meanwhile, I am going to rest today from digging, and more rain is coming tomorrow. So we will see. If you have any wisdom about this, I’d love to hear from you.

Pond Dig, part two

More on my adventures in digging a small pond! Yesterday I finished digging the first layer of the pond, down to the level of the planting shelf, about 1 foot. I checked whether it was fairly level after I was done. And then I did some math to figure out what 1/2 to 1/3 of the total surface area would be, which is the best size for the planting shelves.

For those who might wonder, here is how I worked on that: Using a website that computes circle area, I found that for my 11′ by 11.5′ pond, the total surface area was about 100 square feet. If I made a planting shelf one foot deep, the resulting circle would be 9′ by 9.5′, with a surface area of 67 square feet, meaning the planting shelf included 33 square feet. I was surprised that just 1 foot at the edge already brought it to 1/3 of the area. Doing two feet would leave a circle of 7′ by 7.5′, or 41 square feet, with 59 square feet for planting. So I took half of that, and decided to do 1 foot wide on one half, with 2 feet wide on the other half, approximately. Even though the math is exact, the actual pond will be less so, but it gave me an idea of what I was aiming for. I marked it out with white flour, including a spot for a step, that would be dug to 1 more foot down, to make it easier to get in and out of the pond center.

Pond layer one, with my rough markings for planting shelves and a step

Meanwhile, I’ve heard back from folks who have bits and pieces of carpet–I had asked for at least 2 feet wide, and the responses have ranged from 2′ by 2′, to a medium size carpet. I picked up some yesterday, and will do more today. It has been fun to have these interactions with folks, limited as they are–so rare for me in a time of COVID. Since I don’t have a truck, the smaller pieces actually work because they fit in the back of my car.

Meanwhile, the pond liner was delivered yesterday too! A very heavy box was dropped in our driveway by UPS. (I think I remember that it was going to be 138 pounds) Unable to lift it myself, or even together with Margy, she had the idea to roll it onto a larger piece of cardboard (which we always have in our garage for various garden projects) and then we could pull that cardboard together along the driveway to a better spot–and it worked. So it is waiting by the side of our house. It made me realize, though, that when I actually install the liner in the pond, I will definitely need help from a few friends.

Four years ago, the pond was part of our original plan for our permablitz–when twenty-some people came by and helped us with all manner of garden projects. (If you are curious about that, you can find more here.) It was such a humbling and gratifying experience to be gifted with the energy of so many to begin to create this permaculture garden where we live. With everything else going on that day, it was decided that the pond would be too much to attempt. But it is wonderful to remember how community enables us to live better with our land, how the gift of each other’s time and energy enriches all who participate. With COVID we’ve been on our own so much, and yet even so, we rely on the help of others–delivery people, for example, and neighbors who have picked up needed items in stores. It has brought us closer together with our neighbors actually. We are so programmed by our society to try to be self-sufficient. It is hard to be reminded of our need for each other–and yet that need is a blessing.

Meanwhile, it was also a blessing to be digging on my own, outside in a beautiful sunny day. Squirrels were playing, birds singing, daffodils shining bright yellow, and the cherry and peach trees are beginning to blossom. I started on the next layer of the pond. Our soil is very sandy and compacted–we had an inch of rain fall on Friday, and none of it stayed in the depression that I had already dug. So the recommendation is to slope the sides as we go down so it doesn’t collapse. Step by step, and with a little help, I think it can be done.

Digging begun on second level.

The Little Pond

In our permaculture design for our land from 2017, we included a little pond, about 11 by 12 feet round. Every so often, I would dig in it a bit, and find a place to put that soil. Finding a spot for what is dug up is actually a major issue in digging a pond. Some of the topsoil made its way into what is now a bed for blueberries. But mostly, I didn’t have the energy to take on another big project.

The future pond, as it looked with what I dug out before this year.

However, this spring I felt a burst of energy each time I went into the yard, and I felt the future pond calling to me! So I read once again Robert Pavlis’s book Building Natural Ponds, and made a list of everything I would need. I talked it over with Margy. The biggest expense is buying a pond liner, recommended 45 mil EPDM rubber. For our size pond, with the deepest part 3 feet deep, we’d need a 20 by 20 foot liner. (Formula: width plus 2x depth plus 2 feet for edge, times length plus 2x depth plus 2 feet.) Other needs include old carpet strips to lay over the ground under the liner, to protect against roots and rocks–and we’ve got bittersweet roots, so this might be essential. It will need lots of stones to line the planting shelves and the edges, and then a number of pond plants, to serve to clean the water, and of course to look beautiful. This kind of natural pond does not have any mechanical filters–just plants. So 1/2 to 1/3 of the pond is made up of planting “shelves” that are only about 8-12 inches deep.

Why include a pond? One reason is that it brings more water into the landscape. For some sites, ponds are a way to store water, but that won’t be as big a need for our site. We have rain barrels for that. We can use water from the rain barrels to fill the pond, and refill as needed. For us, a pond will mostly be for wildlife, like frogs and birds. We are told that if you build it, the frogs will come. And for us, another reason is to be able to look at the beauty of the water and water plants, when we are sitting in the yard. What a good reminder of the sacredness of water.

The biggest amount of work to make the pond is the digging. But we finally figured out a place to put the dirt. In the back corner of our yard, some former resident dumped a pile of concrete and metal demolition junk. We’d thought about trying to haul it away, but that would be a huge job, and cost money to take away. Most years, it has been covered with wild raspberries that don’t bear any fruit because it is too shady. This spring, I pulled out much of the raspberries and some invasives, and got a good look at the junk underneath. Concrete, metal, demolition debris.

Old demolition debris in the back of the yard.

So this is where we will put the sandy under-soil I dig from the pond. Then I’ll put cardboard over the resulting mound (to rein in the invasives), put down some compost and other soil on top of the cardboard, and then plant some shade loving plants on the mound. Another project.

A few days ago, I started an overflow spillway, an area on the edge of the pond that is 4 inches lower, so if the pond gets too full, the water has a place to go. I figured out, from the book, that it didn’t have to go very far, maybe 8 feet away or so, where the water could sink into our sandy soil. Then, the last few days, I have been slowly digging out the first layer, to the depth of the planting shelves. Here is how much I was able to finish by today.

It’s hard to tell that the depth of the pond is now about 1 foot, except for the part in the center that I didn’t finish to that level yet.

I shovel out the dirt into a wheelbarrow, using a level to try to keep the pond surface level–which will be important–then I bring that dirt over to the demolition pile, and dump it there. It doesn’t actually look like that much, but I hauled away several wheelbarrows full just in the last couple days. I don’t know what the former residents did with this part of the yard, but it seems like there are some ashes and charcoal buried in the future pond, along with a very rusty sandy soil. Oh, and here is what the junk corner looks like now.

Junk pile beginning to disappear under dirt piles.

So, yesterday, I ordered a pond liner. I was able to find a liner, with an underlayer, for $438. I also posted on “buy nothing” and “freecycle” pages requesting old carpet strips. I’ll keep you updated. This is going to happen!

“Ghost” Trees

Peach (in front) and cherry trees treated with Kaolin clay.

Yesterday, I prepared a mix of kaolin clay and water, and sprayed all the branches of the peach and cherry trees in our little orchard. This is an organic solution to curculio insect pests, among some others. Now they are totally white and look like ghost trees. The leaf buds are starting to open on the cherries, and flowers will be here soon. Last year, our peach tree produced many peaches, but they were almost all destroyed by pest bugs. We got to eat two peaches. (They were delicious by the way.) We had somehow assumed that it might take at least a year for bugs to find them, but bugs are smart. So it was a useful lesson in observation. But this year, we hope to actually eat some peaches.

I have been committed to figuring out how to protect them organically. This spring I started reading once again The Holistic Orchard by Michael Phillips, which has been my guide during my fruit-tree food forest adventure. Each spring I forget what I did the prior year, having only a few trees and a few times to do any part of this project. This time reading, a few more ideas stuck further into my brain, and I found a few new ideas too. First of all, which I didn’t forget, was to try to make sure they have all the nutrients they need in the soil. Phillips had a section about how to interpret soil tests, and last fall, Margy did a soil test for the peach tree bed. Since the fall, I have added more compost, seaweed, some rock dust and green sand which are all long-term nutrient boosters. I also ordered some potassium sulfate of potash because the soil test said the soil was low in potassium, and some alfalfa meal to add some extra nitrogen which was also low. I will add those once the trees are more in flower.

In prior years, I have done the holistic sprays that Phillips recommends, and now I am trying to create my own timeline for which ones come when, so that I don’t have to figure it out each time all over again. I love this book, but it is not well organized for beginning orchardists. Vital information is scattered across various parts of its 400 pages. It is the book of someone who knows way too much about all aspects of orchards for a beginner to have much of a chance. His primary focus has been apples, and other fruits each have their own sections. Still–re-reading it each year seems a good way to go.

I do have to laugh though, because I found the key piece of information I needed for my peach and cherry trees only in a footnote–a footnote! And that footnote said: “Massively coating stone fruits [cherry and peach are stone fruits] with multiple applications of refined kaolin clay for curculio is less than ideal once fruit begins sizing in earnest. Cherries bloom before apples, and with far less leaf showing initially. Surround [brand name of kaolin clay] applied at this critical juncture on the just-about-to-pop flower buds delivers a message to this pest to move onward to other prospects. Curculio makes its way by crawling, particularly early on when temperatures tend to be cooler. The main route to developing fruit is by way of the limb highway, and thus the reason for thorough coverage on the branch structure of the tree. Two applications going into bloom will do the trick in a warm spring, with an additional application as soon as petal fall begins probably necessary in a cooler season.

See what I mean? But yesterday, as the buds on the cherry were just starting to open, I sprayed it with kaolin clay, and then I repeated it once that had dried. Now they are white, and I hope they are protected for now.

It was lovely to be outside. In between applications I did some raking and some lying in the hammock, and eating my lunch under the patio umbrella. What a great way to celebrate Earth week.

Raised Garden Bed, Part 2

After putting in the structure of my cedar raised garden bed, I have been gradually filling it with layers of compostable material along with the soil I had taken out. This is called “sheet mulching” or “lasagna gardening” and is a great easy method to enrich the soil. In its most complete form, sheet mulching includes laying down cardboard or newspapers on top of whatever is growing on the ground (lawn, etc.) without any digging required. But since I wanted to have a deeper root zone in this raised bed, I did weed the soil and dig down deeper. Autumn is an excellent time to sheet mulch because the bed will have all winter to decompose and be ready for planting in the spring.

This is a form of composting in place, so you alternate layers using amendments rich in nitrogen (called “green”) or carbon (“brown”), but it also depends on what you happen to have in your yard. A basic permaculture principle is that waste is just nourishment for another part of the life cycle. So we are taking “waste” and giving it a chance to grow food next year. We have lots of leaves in our yard, so that is an important source of “brown”, and we also live within a half hour of the beach, so we use seaweed gathered at the shore as a source of “green.” I had a chance to go to Kettle Cove on Sunday to gather a bunch.

Kettle cove beach with seaweed.

Here is my list of layers from the bottom (5 inches below ground level) up, with some photos along the way:

  • soil from the site
  • rock dust: I added some handfuls of rock dust, which adds trace minerals (I had collected a bucket-full a few years ago from a local quarry.)
Rock dust over soil in raised bed.
Rock Dust over soil
  • a bit of old seaweed, collected earlier this year.
  • leaves mixed with a little bit of grass clippings, from Margy’s leaf collecting.
  • a few branches (I remembered this from my hugelkultur adventures) These are good for water retention, slow release of nutrients—I just added a few, and then buried them in the leaves—I could have done a lot more, but also didn’t want to limit the roots.
leaves, branches
  • more soil
  • After my trip to the beach, I added more fresh seaweed, a generous layer of it: seaweed is a great source for nitrogen, potassium, phosphate and magnesium, and many trace minerals. Note, I also added the second layer of cedar planks to bring it to its full height of 11 inches.
Seaweed in the raised bed.
  • more dried leaves with a little bit of grass clippings
  • composted coffee chaff (which was in a barrel we kept next to our compost bin to add after kitchen scraps: after a couple years it composted itself!)
  • more soil
  • a couple inches of composted manure: we have a pile of it from last year, but we have to sift it because it has become full of roots.
  • green cuttings from garden cleanup.
Garden cuttings over compost.
  • leaf mould from leaves left in a barrel for a couple years
  • more leaves to top it off.

And today it is complete! The rest will be done by winter, and soil creatures and time.

Pesto

This past week’s big garden project was making pesto. I’m not an expert on preserving food from the garden, but discovered that while oregano and thyme were easy to dry, things like chives and basil didn’t work for me to dry. But making pesto and freezing it has been great. We just finished using the last of our pesto from last summer, and it was time to make it again.

So here is my very loose recipe for anyone who might want to try it. First of all, cut big bunches of stalks of basil, parsley, and chives from your garden. And really, any combination of these will work, though I think of basil as the primary ingredient of pesto.

Basil & chives

Basil & Chives & Olive oil

Pinch the basil leaves off the stalks and place in a salad spinner–you can wash and dry them in the spinner. Do the same for parsley–I just cut the leafy parts off the stalks. Our garden is organic, but rinsing deals with any random bugs or dry leaves or other impurities that might be attached.

Parsley

Parsley in the salad spinner.

Chives can be rinsed briefly, and cut with a knife into couple inch lengths. Once these are ready, start with a blender. First, put in 1 cup of olive oil, and then reserve 1/2 cup for use as needed to keep the blender stirring easily. Add the basil and blend, add the parsley and blend, add the chives and blend. Or do this in any order you like. I also added 4 Tablespoons of lemon juice, salt and peper, 1 clove garlic, and some garlic scapes. I don’t do well with too much garlic, but you might want to add more if you like it.

Finally, I added one cup of raw hazelnuts. Traditionally, people use pine nuts, but they are more expensive and since we have hazelnut bushes, it seemed fitting, though our bushes haven’t produced any nuts yet. Later, when we use the pesto, we will add parmesan cheese.

Finally, I line a baking pan with wax paper, and put the pesto mixture on this paper in small lumps–like cookies. Place the whole pan in the freezer until the mixtures have frozen, and then I fold them up in the wax paper and store in freezer bags.

Pesto "cookies"

Pesto “cookies”

Through the winter, we take out the pesto cookies and use as many as we need with baked chicken, with zucchini noodles, with anything that could use a bit of bright flavor. I ended up needing to make two batches because I had so much basil. And the basil plants will grow back again, so we could make more later on. So much fun.